Step by step guide to building your gaming PC

Many of us want to get into the PCMR. Those high framerates, maximum graphical fidelity, mods and the ability to record and stream games at the same time is something every gamer wants to do. But as we know, pre-built PCs are expensive and with system integrators throwing in a massive premium for building the PC and adding in their own bloatware many are skeptical of buying a prebuilt PC. It’s because of this that quite a few people might want to look into building their own computer themselves. So let’s help you build your own gaming PC.
Precautions:
Right off the bat, it’s very difficult to mess up building a computer. As long as you don’t bend any pins during the installation process of the CPU, you should be fine. Another thing to know is that electronic components are sensitive to static discharge. Make sure to ground yourself before building the computer. This can be done by taking off all footwear including socks(go barefoot) and staying away from carpet or anything that may build up static electricity(sweaters). Ground yourself by touching anything metal that’s connected to the ground wire on a plug point. Plug it in and touch it. You can get an anti static bracelet for extra precaution, but you should be fine without it as long as you follow the above mentioned steps.
Getting the right parts:
To build a computer, getting the right parts is necessary. pcpartpicker.com is an amazing site to look for compatible parts. The prices aren’t usually very accurate in India but it should give you a decent understanding of what parts to get and what is compatible with what. For part recommendations, I’d suggest check out our guide on picking parts for your gaming PC. It will get you a better understanding of the components and their pricing. Order parts only after cross referencing every site. Newegg is a good site to get PC parts, if in the US. For India, I would recommend Amazon, but their prices tend to be slightly higher. You should also check with local vendors.
Also, if you are from Delhi, you can visit Nehru Place and if you’re Mumbai, you can visit Lamington Road. The shops will offer you better pricing, but you should also stay aware of scammers.
A general rule of thumb is that if the price is too high or too low, you should stay away from such dealers as there’s a risk of a potential fraud/scam.
Now to the final part, putting the components together i.e. actually building the PC.
Building the PC:
This build guide is mainly for an AMD system, but if you’ve gone Intel, then worry not, for the general way to go is basically the same after the installation of the CPU. Make sure you have a build guide video open on the side, preferably from a reputable source like Linus Tech Tips or JayzTwoCents. If that’s not possible, watch a bunch of them before building the computer.
To start off, I’d suggest taking the motherboard out of the box and promptly putting it on the box it came from. The box is usually cardboard, which means that it’s non conductive and can act as a makeshift soft table.
Step 1:
For the CPU(AMD), first list up the retention arm on the motherboard GENTLY. After doing this, line the triangle at a corner of the CPU with the triangle given on the CPU slot of the motherboard. The CPU should just drop in. Make sure no pins are bent. If it doesn’t drop in, take it out gently and realign.
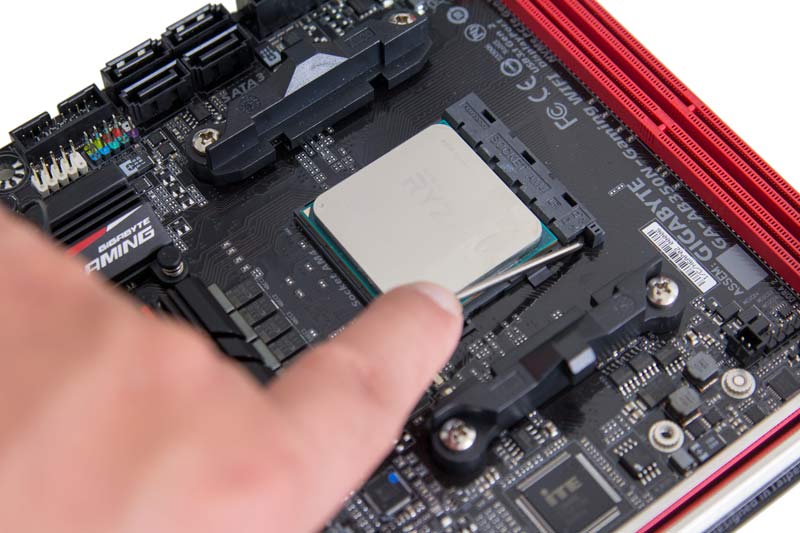
Once this is done, put the retention arm back where it was and congratulate yourself for completing the hardest part of the build.
Step 2:
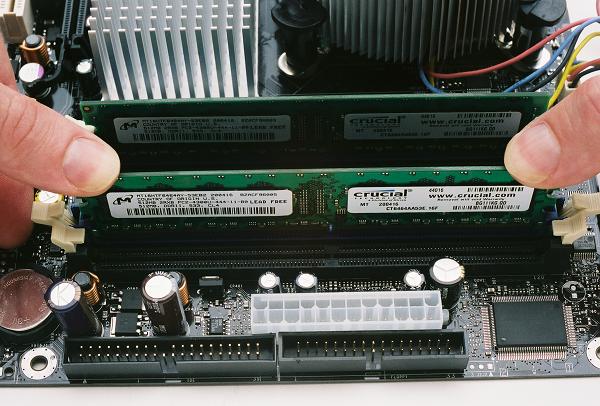
As for the RAM, if you’ve gone with 2 sticks as we recommended, make sure you check your motherboard manual to see which slots they go into first. On the majority of motherboards, the ram goes into slots 2 and 4 from the CPU to get dual channel working. Why 2 and 4 instead of 1 and 2 or 3 and 4? I honestly don’t know, but it is as it is for a reason, so just follow it.
Make sure to pull back the retention clips on the ram slots before installing the RAM.
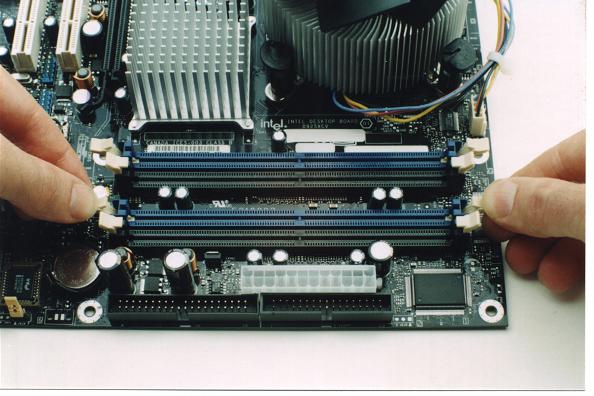
Also while installing, make sure to push on both sides of the ram stick with two fingers when pushing it in as to apply even pressure. The stick should make an audible CLICK sound when it’s installed properly.
Step 3:
As for the SSD, if you’ve gone with an M.2 non-NVME SSD, plug it into the M.2 slot on the board and screw it down with the screws that came included with the motherboard. The screws are pretty small so I’d suggest going with a magnetic screwdriver.
Before we talk about installing the SSD, it is important to know what type of SSD you have. In case you don’t know which one you have, refer the below image and you’ll find out the type of your SSD drive.

If you’ve got an NVME SSD, then go ahead and plug it into the NVME SSD slot on the motherboard. This slot looks identical to the m.2 slot and usually has some sort of marking on it to indicate that it is for NVME SSDs. Some manufacturers write ULTRA M.2 where the NVME SSD is supposed to go.
A SATA M.2 cannot go into the NVME M.2 slot. If you’ve got a 2.5 inch or SATA SSD, then connect the SSD to the SATA ports on the motherboard and the SATA cables on the Power Supply. This SSD can be mounted onto the case later, where SSD mounts are provided. Or let it just flop around in the case. SSDs don’t have any moving parts so they can just sort of lay around. But for better life & aesthetic purposes, mount it.
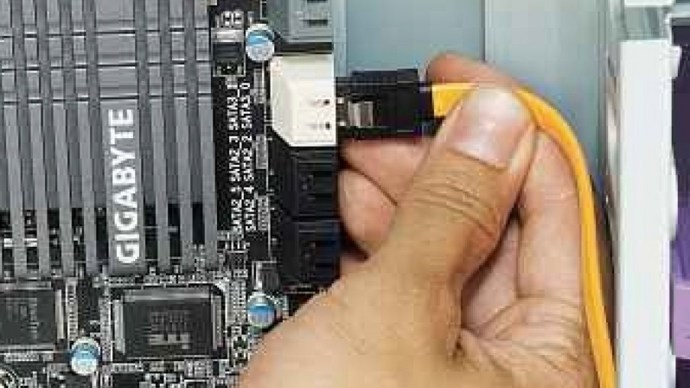
For installing the HDD, you just have to plug in the SATA cables into the SATA ports on the HDD & connect the power pins.
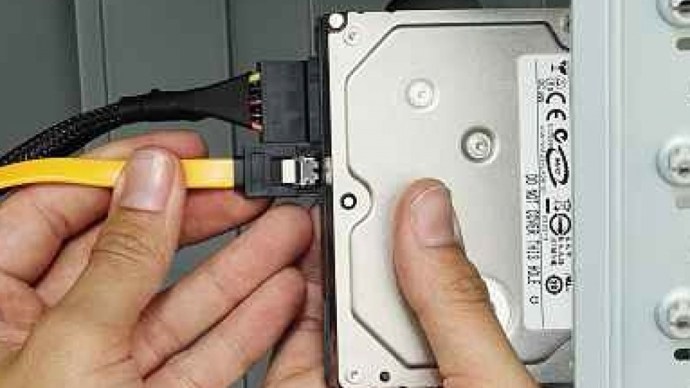
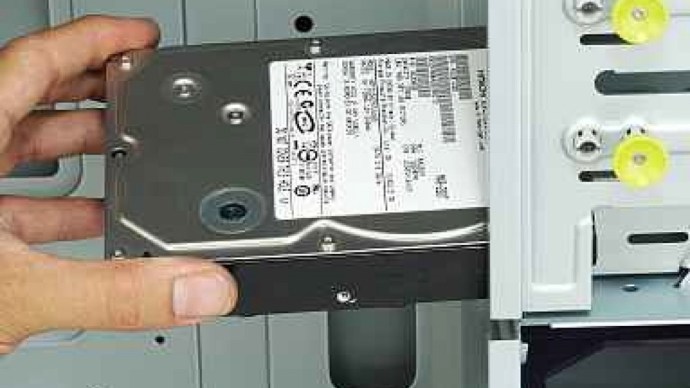
Also, you have to mount the HDD into the mount tray.
Step 4:
Most AMD CPUs(except the 3rd gen XT series and the 5800x and above) come with a system fan included in the box. If your CPU doesn’t come with one, you’ll have to buy it separately. We recommend to replace the stock cooler if your CPU is from Intel, as Intel stock coolers are ineffective and the build quality is isn’t that good.
Mounting the cooler should be pretty easy. First off, take out the plastic adapters on the board and use the backplate of your motherboard to mount the cooler. The adapters are useful when mounting a different cooler if you want to upgrade in the future. If you also bought thermal paste or had to buy it because your aftermarket cooler doesn’t come with it, then apply it in an “X” pattern. After doing this, if your cooler already had thermal paste, then use isopropyl alcohol to wipe it off clean and then put the cooler on top of your CPU. The pressure from mounting the cooler should spread the thermal paste evenly across the surface of the die.

Screw in the cooler going 2 rotations on each corner at a time, as going in completely tight on each side risks damaging the motherboard. Repeat until every screw is tight. Now that this is done, plug the fan cable into the system fan 1 pins on your motherboard or whatever your motherboard manual recommends. If the cooler has RGB, then plug it into the RGB header as well. With that, the cooler should be mounted and installed. Case fans also plug into the motherboard.
Step 5:
P.O.S.T(Power on self test) .This isn’t a completely necessary step but it’s a nice thing to do. Plug in the graphics card into the port nearest to your CPU, which is the PCIE x16 slot. After doing this, if it requires more power, then plug your power supply into the gpu as well. The cables on the power supply should read PCIE power. Plug the rest of the cables into the motherboard and turn the power supply on. The next step is to take a screwdriver and locate the power pins on your motherboard. These are what cause the computer to turn on and off. Connect a cable from the GPU to your monitor and short those pins by touching them with the screwdriver. If you’ve done everything correctly upto this point, nothing should appear on screen because your monitor isn’t turned on. Turn the monitor on and you should hopefully see the BIOS screen of your motherboard brand.

You may take another break. If this does not happen, then check if everything is plugged in properly, including the cables, Ram, GPU and fans. As a last resort, reseat the CPU by taking it out and putting it back in. If this does not work, then it might be that one of your parts is faulty. Get a replacement and return to step one of the guide.
Step 6:
This should be easy. Just unplug all the cables and the graphic card from the motherboard after turning the PC off after posting and screw the motherboard into your case using the given screw holes and screws. Re-plug the GPU, cables and case fans and the case IO into the respective pins as directed by your motherboard manual.
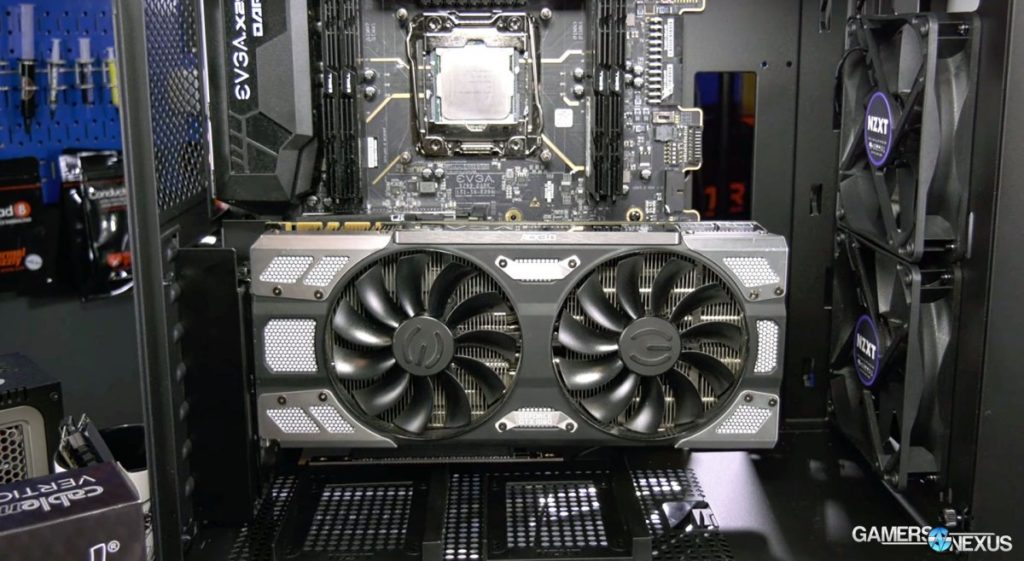
For slotting in the GPU, remove the PCIE covers on your case and screw the GPU bracket in. This may take some aiming but should be relatively easy. On doing this, check if the PC posts one last time, this time with the power button on your case and if everything powers up well, you are nearly done.
What to do after building your Gaming PC:
First things first, go into BIOS and enable XMP. Make sure your RAM is running at the speed you bought it at and press F10 to save and exit. Install windows from a USB or disc. Finally, on booting into windows, install the latest graphics drivers for your GPU from Nvidia or AMD’s site and you’re good to go! As a side note, if you have a high refresh rate monitor, make sure you go into windows display settings->advanced display settings and change the monitor refresh rate to what it actually is. Also, always make sure you plug your monitor into the GPU HDMI or display ports and not the motherboard ports since you won’t get any of the performance you paid for otherwise.
That was about it for the building tutorial. Happy building!
This article was written by Yash Singh, a guest contributor who is also an ardent gamer.


I’m truly enjoying the design and layout of your blog.
It’s a very easy on the eyes which makes it much more pleasant for me to come here and visit more often.
Did you hire out a developer to create your theme? Fantastic
work!
After looking over a handful of the blog posts on your web page, I honestly
appreciate your technique of blogging. I book-marked it to my bookmark webpage list and will be
checking back soon. Take a look at my web site as well and tell me your opinion.
What’s up colleagues, fastidious paragraph and fastidious arguments commented here, I am
in fact enjoying by these.
Hi there, I read your new stuff daily. Your humoristic style
is awesome, keep it up!
Feel free to surf to my web site – tracfone coupon
Thank you, I have recently been searching for information approximately this topic for a while and yours is the best I have came upon so far. However, what about the conclusion? Are you sure concerning the source?
I’m not positive where you are getting your info, however good topic. I needs to spend a while studying more or understanding more. Thank you for magnificent information I used to be looking for this information for my mission.
I enjoy what you guys are up too. This sort of clever work and exposure! Keep up the amazing works guys I’ve incorporated you guys to my personal blogroll.
Hello there, I do believe your site might be having internet browser compatibility issues. When I look at your website in Safari, it looks fine but when opening in Internet Explorer, it has some overlapping issues. I just wanted to give you a quick heads up! Apart from that, fantastic website!
Hi, i think that i saw you visited my website so i came to return the favor.I am trying to find things to improve my website!I suppose its ok to use some of your ideas!!
Howdy! I’m at work browsing your blog from my new iphone 4! Just wanted to say I love reading your blog and look forward to all your posts! Keep up the fantastic work!
Thank you for any other wonderful article. Where else may anyone get that kind of information in such a perfect way of writing? I have a presentation next week, and I am at the look for such information.
Saved as a favorite, I like your blog!
Appreciating the persistence you put into your website and in depth information you provide. It’s good to come across a blog every once in a while that isn’t the same outdated rehashed material. Excellent read! I’ve saved your site and I’m including your RSS feeds to my Google account.
continuously i used to read smaller articles or reviews which also clear their motive, and that is also happening with this article which I am reading at this time.
Wow, incredible blog format! How long have you been blogging for? you make blogging glance easy. The total glance of your web site is wonderful, let alonesmartly as the content!
Inspiring quest there. What occurred after? Thanks!
It’s very easy to find out any topic on net as compared to books, as I found this article at this site.
Ahaa, its pleasant conversation regarding this article here at this weblog, I have read all that, so now me also commenting here.
I like the valuable information you supply in your articles. I will bookmark your weblog and check again here frequently. I am quite certain I will be informed plenty of new stuff right here! Good luck for the following!
Great post.
This is a topic that is close to my heart… Many thanks! Where are your contact details though?
I don’t even know how I ended up here, but I thought this post was good. I don’t know who you are but definitely you are going to a famous blogger if you are not already Cheers!
Hi there, after reading this awesome piece of writing i am also happy to share my familiarity here with mates.
Informative article, exactly what I wanted to find.
Thanks for the marvelous posting! I truly enjoyed reading it, you’re a great author.I will ensure that I bookmark your blog and will come back later in life. I want to encourage that you continue your great writing, have a nice afternoon!
Hurrah! After all I got a blog from where I know how to really get useful information regarding my study and knowledge.
Greate article. Keep writing such kind of information on your page. Im really impressed by your blog.
I like the valuable information you provide in your articles. I will bookmark your weblog and check again here frequently. I am quite certain I will learn lots of new stuff right here! Good luck for the next!
Hi there, i read your blog occasionally and i own a similar one and i was just wondering if you get a lot of spam comments? If so how do you prevent it, any plugin or anything you can advise? I get so much lately it’s driving me insane so any help is very much appreciated.
I’m not sure where you are getting your info, but good topic. I needs to spend some time learning more or understanding more. Thanks for wonderful information I was looking for this information for my mission.
Great post. I am facing some of these issues as well..
Simply wish to say your article is as amazing. The clearness in your post is simply nice and i can assume you are an expert on this subject. Well with your permission allow me to grab your RSS feed to keep up to date with forthcoming post. Thanks a million and please keep up the rewarding work.
Appreciate the recommendation. Will try it out.
This is my first time go to see at here and i am actually happy to read all at one place.
great publish, very informative. I wonder why the other experts of this sector do not realize this. You should continue your writing. I am sure, you have a huge readers’ base already!
Превосходный мужской эротический массаж Москва релакс спа
I read this piece of writing fully regarding the comparison of most up-to-date and preceding technologies, it’s awesome article.
You ought to take part in a contest for one of the greatest sites on the net. I most certainly will recommend this site!
Useful info. Fortunate me I found your site by accident, and I am stunned why this twist of fate did not came about in advance! I bookmarked it.
I have been surfing online more than three hours today, yet I never found any interesting article like yours. It’s pretty value enough for me. In my opinion, if all site owners and bloggers made just right content as you did, the net will probably be much more useful than ever before.
hi!,I really like your writing so so much! proportion we communicate more approximately your post on AOL? I need an expert in this space to unravel my problem. May be that is you! Looking forward to peer you.
Everything is very open with a precise explanation of the issues. It was truly informative. Your website is very helpful. Thank you for sharing!
I love your blog.. very nice colors & theme. Did you create this website yourself or did you hire someone to do it for you? Plz answer back as I’m looking to create my own blog and would like to know where u got this from. cheers
I am really loving the theme/design of your site. Do you ever run into any web browser compatibility problems? A couple of my blog visitors have complained about my blog not operating correctly in Explorer but looks great in Chrome. Do you have any advice to help fix this issue?
I am sure this article has touched all the internet people, its really really pleasant article on building up new weblog.
784573 350684Some truly good and utilitarian information on this web web site , likewise I believe the style and style holds fantastic features. 430545
WOW just what I was searching for. Came here by searching for %keyword%
If you wish for to get much from this piece of writing then you have to apply such strategies to your won blog.
Because the admin of this website is working, no doubt very soon it will be famous, due to its quality contents.
It’s awesome to pay a visit this website and reading the views of all friends about this post, while I am also keen of getting knowledge.
First off I want to say wonderful blog! I had a quick question that I’d like to ask if you don’t mind. I was curious to know how you center yourself and clear your mind before writing. I have had a hard time clearing my mind in getting my thoughts out. I do enjoy writing but it just seems like the first 10 to 15 minutes are wasted just trying to figure out how to begin. Any ideas or tips? Thanks!
Hi there, constantly i used to check blog posts here early in the break of day, since i love to learn more and more.
There is definately a lot to know about this topic. I like all the points you made.
Howdy I am so thrilled I found your weblog, I really found you by error, while I was searching on Google for something else, Anyhow I am here now and would just like to say thanks a lot for a incredible post and a all round interesting blog (I also love the theme/design), I dont have time to browse it all at the minute but I have book-marked it and also added in your RSS feeds, so when I have time I will be back to read a great deal more, Please do keep up the fantastic jo.
Since the admin of this web site is working, no doubt very soon it will be well-known, due to its quality contents.
It’s actually very complex in this full of activity life to listen news on TV, so I only use world wide web for that purpose, and get the most recent news.
I must thank you for the efforts you have put in writing this blog. I am hoping to see the same high-grade blog posts from you in the future as well. In fact, your creative writing abilities has motivated me to get my very own website now
Thanks for sharing your thoughts on %meta_keyword%. Regards
Wonderful web site. A lot of useful information here. I’m sending it to a few pals ans also sharing in delicious. And naturally, thank you on your effort!
I love it when individuals come together and share thoughts. Great website, keep it up!
I think this is one of the so much important information for me. And i’m glad reading your article. However want to statement on few basic things, The site taste is perfect, the articles is really nice : D. Good process, cheers
Hi this is kinda of off topic but I was wondering if blogs use WYSIWYG editors or if you have to manually code with HTML. I’m starting a blog soon but have no coding experience so I wanted to get advice from someone with experience. Any help would be greatly appreciated!
This is a great tip especially to those new to the blogosphere. Short but very accurate information Many thanks for sharing this one. A must read article!
Great info. Lucky me I found your site by accident (stumbleupon). I have saved it for later!
I blog quite often and I truly appreciate your content. The article has really peaked my interest. I am going to bookmark your website and keep checking for new information about once a week. I subscribed to your RSS feed as well.
These are really impressive ideas in about blogging. You have touched some nice factors here. Any way keep up wrinting.
hi!,I really like your writing so so much! percentage we keep up a correspondence more approximately your post on AOL? I need an expert in this space to solve my problem. May be that is you! Looking forward to see you.
Yes! Finally something about %keyword1%.
Greetings from Los angeles! I’m bored to death at work so I decided to browse your website on my iphone during lunch break.
I enjoy the knowledge you provide here and can’t wait to take a look when I
get home. I’m amazed at how fast your blog loaded on my mobile ..
I’m not even using WIFI, just 3G .. Anyways, good
blog!
I’m really enjoying the theme/design of your website. Do you ever run into any
internet browser compatibility problems? A few of my blog audience have complained about my website not working correctly in Explorer but looks great in Firefox.
Do you have any recommendations to help fix this issue?
I am curious to find out what blog system you have been working with? I’m experiencing some minor security problems with my latest website and I would like to find something more risk-free. Do you have any solutions?
Have you ever considered creating an e-book or guest authoring on other sites?
I have a blog centered on the same information you discuss and would
love to have you share some stories/information. I know my readers would enjoy your work.
If you’re even remotely interested, feel free to shoot me
an e-mail.
When I originally commented I seem to have clicked the -Notify me when new comments are added- checkbox and now each time a comment is added I recieve four emails with the same comment. Is there a way you can remove me from that service? Thank you!
That is a really good tip particularly to those new to the blogosphere.
Short but very accurate info… Appreciate your sharing this one.
A must read article!
Hello! This post couldn’t be written any better! Reading this
post reminds me of my old room mate! He always kept talking about this.
I will forward this post to him. Pretty sure he will have a good read.
Thank you for sharing!
Does your website have a contact page? I’m having problems locating
it but, I’d like to send you an e-mail. I’ve got some ideas
for your blog you might be interested in hearing. Either way, great blog and I look forward
to seeing it grow over time.
Pretty section of content. I just stumbled upon your website and in accession capital to assert
that I get in fact enjoyed account your blog posts.
Any way I’ll be subscribing to your augment and even I achievement
you access consistently rapidly.
I do not know if it’s just me or if everybody else encountering problems with your
blog. It appears like some of the written text in your
content are running off the screen. Can somebody else please
comment and let me know if this is happening to them too?
This may be a issue with my internet browser because I’ve had this happen before.
Kudos
constantly i used to read smaller articles that
also clear their motive, and that is also happening with
this paragraph which I am reading at this time.
Heya i’m for the first time here. I found this board
and I find It truly useful & it helped me out
much. I hope to give something back and aid others like you
helped me.
I am in fact thankful to the owner of this web site who has shared this impressive article at at this place.
Highly energetic article, I loved that a lot. Will there be a part 2?
Thanks on your marvelous posting! I quite enjoyed reading it,
you are a great author. I will be sure to bookmark your blog and will
often come back someday. I want to encourage that you continue your
great job, have a nice holiday weekend!
If you are a slots lover, you can locate
around 300 slot games having said that, they aren’t branded.
What’s up everyone, it’s my first pay a visit at this web site, and piece of writing is truly fruitful in favor of me, keep up posting such articles.
I am really thankful to the owner of this web site who has shared this wonderful piece of writing at at this place.
I don’t know if it’s just me or if everyone else experiencing problems with your website. It appears like some of the text within your posts are running off the screen. Can someone else please comment and let me know if this is happening to them too? This might be a problem with my web browser because I’ve had this happen before. Cheers
Fabulous, what a webpage it is! This weblog provides useful data to us, keep it up.
Хотите получить идеально ровный пол в своем доме или офисе? Обратитесь к профессионалам на сайте styazhka-pola24.ru! Мы предлагаем услуги по стяжке пола любой сложности и площади, а также устройству стяжки пола под ключ в Москве и области.
снабжение строительными материалами строительного объекта
На mehanizirovannaya-shtukaturka-moscow.ru вы найдете бесподобные услуги механизированной штукатурки. Экономьте время, гарантируйте себе качество.
It’s a shame you don’t have a donate button! I’d most certainly donate to this excellent blog! I suppose for now i’ll settle for book-marking and adding your RSS feed to my Google account. I look forward to fresh updates and will talk about this blog with my Facebook group. Chat soon!
As the admin of this website is working, no uncertainty very soon it will be famous, due to its quality contents.
Im not that much of a online reader to be honest but your blogs really nice, keep it up! I’ll go ahead and bookmark your site to come back in the future. Cheers
Hello there, just became aware of your blog through Google, and found that it is really informative. I’m gonna watch out for brussels. I will appreciate if you continue this in future. Many people will be benefited from your writing. Cheers!
Aw, this was an extremely nice post. Taking the time and actual effort to produce a good article but what can I say I put things off a lot and never seem to get anything done.
Технология штукатурки по маякам стен гарантирует великолепный результат. Узнайте больше на mehanizirovannaya-shtukaturka-moscow.ru
Have you ever thought about creating an e-book or guest authoring on other websites? I have a blog centered on the same subjects you discuss and would really like to have you share some stories/information. I know my viewers would value your work. If you are even remotely interested, feel free to send me an e mail.
Thanks for sharing your thoughts on %meta_keyword%. Regards
smooth night jazz
Can I simply say what an aid it is to find someone who actually knows what they’re speaking about on the internet? You definitely know how one can bring an issue to light and make it important. More individuals need to learn and perceive this aspect of the story. wurinet2.com
Hi, i read your blog occasionally and i own a similar one and i was just wondering if you get a lot of spam feedback? If so how do you reduce it, any plugin or anything you can suggest? I get so much lately it’s driving me mad so any help is very much appreciated.
Thanks designed for sharing such a pleasant idea, piece of writing is nice, thats why i have read it completely
fantastic submit, very informative. I’m wondering why the other experts of this sector do not realize this. You should continue your writing. I am sure, you have a huge readers’ base already!
Hi there, its good piece of writing about media print, we all understand media is a great source of data.
Howdy! This is my 1st comment here so I just wanted to give a quick shout out and tell you I genuinely enjoy reading through your blog posts. Can you suggest any other blogs/websites/forums that deal with the same subjects? Many thanks!
I am regular reader, how are you everybody? This post posted at this website is really pleasant.
Hi friends, how is everything, and what you wish for to say about this post, in my view its in fact remarkable designed for me.
I’m now not positive where you are getting your info, however good topic. I needs to spend a while learning more or understanding more. Thank you for magnificent information I used to be in search of this information for my mission.
It’s actually a nice and helpful piece of information. I’m satisfied that you simply shared this helpful info with us. Please stay us informed like this. Thanks for sharing.
It’s really a nice and helpful piece of information. I’m satisfied that you shared this helpful info with us. Please stay us informed like this. Thanks for sharing.
It is appropriate time to make a few plans for the future and it is time to be happy. I have read this publish and if I may just I want to suggest you few interesting things or suggestions. Perhaps you could write next articles referring to this article. I want to read more things approximately it!
Greetings! Very helpful advice within this article! It is the little changes that produce the greatest changes. Thanks for sharing!
Great goods from you, man. I’ve bear in mind your stuff prior to and you’re simply too great. I really like what you’ve obtained here, really like what you’re stating and the best way in which you are saying it. You make it entertaining and you still take care of to stay it sensible. I cant wait to read far more from you. This is actually a terrific website.
Сайт lucky jet предлагает вам стать частью адреналинового приключения! Регистрируйтесь на 1win и начинайте выигрывать уже сегодня.
I was wondering if you ever considered changing the layout of your blog? Its very well written; I love what youve got to say. But maybe you could a little more in the way of content so people could connect with it better. Youve got an awful lot of text for only having one or two images. Maybe you could space it out better?
Greetings from Carolina! I’m bored to death at work so I decided to check out your website on my iphone during lunch break. I enjoy the knowledge you present here and can’t wait to take a look when I get home. I’m amazed at how quick your blog loaded on my cell phone .. I’m not even using WIFI, just 3G .. Anyhow, very good site!
If you wish for to improve your knowledge only keep visiting this website and be updated with the most up-to-date information posted here.
Please let me know if you’re looking for a author for your site. You have some really great posts and I think I would be a good asset. If you ever want to take some of the load off, I’d absolutely love to write some material for your blog in exchange for a link back to mine. Please blast me an e-mail if interested. Thank you!
Undeniably believe that which you stated. Your favorite justification appeared to be on the net the simplest thing to be aware of. I say to you, I definitely get irked while people consider worries that they plainly do not know about. You managed to hit the nail upon the top and also defined out the whole thing without having side effect , people can take a signal. Will likely be back to get more. Thanks
What’s up to every one, as I am actually keen of reading this website’s post to be updated regularly. It includes pleasant stuff.
It’s a shame you don’t have a donate button! I’d without a doubt donate to this excellent blog! I suppose for now i’ll settle for book-marking and adding your RSS feed to my Google account. I look forward to fresh updates and will talk about this blog with my Facebook group. Chat soon!
On the other hand, many scholars and researchers emphasize the significant influence of external factors in shaping personal values.
Oh my goodness! Incredible article dude! Many thanks, However I am experiencing problems with your RSS. I don’t know why I am unable to subscribe to it. Is there anyone else getting the same RSS problems? Anyone who knows the solution will you kindly respond? Thanx!!
Hello there, I do think your site might be having browser compatibility issues. When I look at your website in Safari, it looks fine however, if opening in Internet Explorer, it has some overlapping issues. I simply wanted to give you a quick heads up! Other than that, wonderful blog!
It’s awesome for me to have a site, which is helpful in favor of my experience. thanks admin
This blog was… how do I say it? Relevant!! Finally I have found something that helped me. Many thanks!
Wonderful goods from you, man. I’ve keep in mind your stuff prior to and you’re simply too wonderful. I really like what you’ve got here, really like what you’re stating and the way by which you are saying it. You are making it entertaining and you still take care of to stay it sensible. I cant wait to read far more from you. This is actually a great website.
Awesome! Its really awesome article, I have got much clear idea concerning from this post.
Hey there just wanted to give you a quick heads up. The text in your post seem to be running off the screen in Safari. I’m not sure if this is a format issue or something to do with web browser compatibility but I thought I’d post to let you know. The style and design look great though! Hope you get the problem solved soon. Cheers
Ahaa, its pleasant conversation about this article here at this weblog, I have read all that, so now me also commenting here.
I for all time emailed this weblog post page to all my friends, as if like to read it then my friends will too.
Awesome blog! Do you have any hints for aspiring writers? I’m planning to start my own site soon but I’m a little lost on everything. Would you propose starting with a free platform like WordPress or go for a paid option? There are so many choices out there that I’m totally confused .. Any ideas? Kudos!
Hi there to every body, it’s my first pay a visit of this blog; this webpage includes remarkable and truly good stuff designed for readers.
Hey there! Quick question that’s completely off topic. Do you know how to make your site mobile friendly? My site looks weird when viewing from my iphone4. I’m trying to find a theme or plugin that might be able to correct this problem. If you have any suggestions, please share. Thanks!
I don’t know if it’s just me or if everyone else experiencing problems with your website. It appears like some of the text within your posts are running off the screen. Can someone else please comment and let me know if this is happening to them too? This might be a problem with my web browser because I’ve had this happen before. Thank you
Wow that was strange. I just wrote an extremely long comment but after I clicked submit my comment didn’t show up. Grrrr… well I’m not writing all that over again. Regardless, just wanted to say fantastic blog!
Hiya! Quick question that’s entirely off topic. Do you know how to make your site mobile friendly? My blog looks weird when viewing from my iphone. I’m trying to find a theme or plugin that might be able to correct this problem. If you have any suggestions, please share. Thanks!
This site truly has all of the info I wanted about this subject and didn’t know who to ask.
Please let me know if you’re looking for a article author for your site. You have some really great posts and I think I would be a good asset. If you ever want to take some of the load off, I’d really like to write some articles for your blog in exchange for a link back to mine. Please send me an e-mail if interested. Many thanks!
This piece of writing is in fact a good one it helps new web viewers, who are wishing for blogging.
Excellent article. I definitely love this website. Keep it up!
Hello there, You have performed a fantastic job. I will definitely digg it and for my part recommend to my friends. I am sure they will be benefited from this site.
It’s really a nice and helpful piece of information. I’m glad that you simply shared this helpful info with us. Please stay us informed like this. Thanks for sharing.
Oh my goodness! Incredible article dude! Many thanks, However I am going through problems with your RSS. I don’t know why I am unable to subscribe to it. Is there anybody else getting the same RSS problems? Anybody who knows the solution will you kindly respond? Thanx!!
I have been surfing online more than 3 hours today, yet I never found any interesting article like yours. It’s pretty worth enough for me. In my opinion, if all website owners and bloggers made good content as you did, the net will be much more useful than ever before.
Yesterday, while I was at work, my sister stole my iphone and tested to see if it can survive a 40 foot drop, just so she can be a youtube sensation. My iPad is now broken and she has 83 views. I know this is completely off topic but I had to share it with someone!
What’s up Dear, are you in fact visiting this web site regularly, if so then you will absolutely take good experience.
Great article! We will be linking to this great article on our site. Keep up the good writing.
Hey There. I found your blog the use of msn. This is a very well written article. I will be sure to bookmark it and come back to read more of your useful information. Thank you for the post. I will definitely comeback.
I was recommended this blog by my cousin. I am not sure whether this post is written by him as no one else know such detailed about my difficulty. You are wonderful! Thanks!
When someone writes an post he/she keeps the plan of a user in his/her mind that how a user can understand it. Thus that’s why this post is amazing. Thanks!
Nice blog here! Also your site loads up fast! What host are you using? Can I get your affiliate link to your host? I wish my website loaded up as fast as yours lol
Piece of writing writing is also a fun, if you be acquainted with then you can write otherwise it is difficult to write.
Francisk Skorina Gomel State University
I constantly spent my half an hour to read this weblog’s posts daily along with a cup of coffee.
What’s up to every body, it’s my first visit of this blog; this website includes remarkable and truly fine stuff for readers.
Hi there, I wish for to subscribe for this blog to take most recent updates, so where can i do it please assist.
Hey there would you mind letting me know which hosting company you’re working with? I’ve loaded your blog in 3 completely different web browsers and I must say this blog loads a lot quicker then most. Can you suggest a good internet hosting provider at a reasonable price? Many thanks, I appreciate it!
My spouse and I stumbled over here coming from a different web page and thought I might check things out. I like what I see so now i’m following you. Look forward to looking over your web page for a second time.
Greetings from Ohio! I’m bored to tears at work so I decided to check out your website on my iphone during lunch break. I enjoy the knowledge you present here and can’t wait to take a look when I get home. I’m amazed at how quick your blog loaded on my cell phone .. I’m not even using WIFI, just 3G .. Anyhow, excellent site!
It is perfect time to make a few plans for the future and it is time to be happy. I have read this submit and if I may just I want to recommend you few fascinating things or advice. Perhaps you could write next articles referring to this article. I want to read more things approximately it!
Франшиза автомойки позволяет быстро начать свое дело с проверенной моделью бизнеса и полным пакетом услуг от партнера.
Hi there to all, as I am actually keen of reading this blog’s post to be updated daily. It consists of nice stuff.
It’s actually very difficult in this full of activity life to listen news on TV, thus I simply use world wide web for that purpose, and get the latest news.
Can I simply say what a relief to find somebody that truly knows what they’re talking about on the net. You definitely understand how to bring an issue to light and make it important. More people should look at this and understand this side of the story. I was surprised that you’re not more popular because you definitely have the gift.
This design is wicked! You obviously know how to keep a reader entertained. Between your wit and your videos, I was almost moved to start my own blog (well, almost…HaHa!) Wonderful job. I really enjoyed what you had to say, and more than that, how you presented it. Too cool!
obviously like your website however you need to test the spelling on quite a few of your posts. A number of them are rife with spelling problems and I find it very bothersome to tell the truth however I will certainly come back again.
Pretty section of content. I just stumbled upon your web site and in accession capital to assert that I acquire in fact enjoyed account your blog posts. Any way I’ll be subscribing to your augment and even I achievement you access consistently rapidly.